Minggu, 31 Juli 2011

Release Cheat Super Dewa Dack + Menghilang + Magneted + Auto HS + No respon +Defuse Bom 0 Detik + Pasang bom 0 Detik Updated Special Weekend

 
Fiture:
-Cheat Dewa Hack (Just For RM)
-Cheat GHOST|Dapat menghilang Dan Tidak dapat Di Kill
(Apabila Anda main di Luxville Kalau Pasang bom Tidak dpt di Defuse)
-Cheat magneted (Mengumpulkan Semua User/pemain ke dalam tengah Area)
-Auto HS
-AimMode
-Defuse 0 Detik
-Pasang Bom 0 Detik
-No Respon
-Invisble Kill| Dapat Kill Musuh Saat baru Respon 
(Cocok Digunakan Bersama Magneted)

Hotkey :
-Cheat Ghsot | Menghilang On    : INSERT
-Cheat Ghost | Menghilang OFF : DELETE

-Magneted On                             : HOME
-Magneted Off                             ; END

-Cheat Super Dewa|Frezze  ON   : ?????
-Cheat Dewa  Dewa|Freezze Off  : Numpad 9

-Aim Mode                                   : F5
-Invisble Kill | Instant kill                : Page Up
-No Respon                                  : Page Up
-Pasang Bom 0 Detik                    : Page Up
-Defuse 0 Detik                             : Page Up

Cara pakai : 
-Download Cheat+password Dari pekalongan Community
-Buka Pb launcher
-Buka Cheat nya
-Masukan password yang barusa kamu download
(Di Copy-paste/Sebaiknya tulis manual)
-Start Pb kamu
-Nunggu Hackshield Di pojok kanan bawah hilang
-Tekan inject Cheat
-Masukan password DLL
(Password Sama Seperti Login Injector)
-Auto resume

Credit : 
-Ferry-Adanya >>> Cheat Dewa Super hack|Frezze
-Kress PB      >>> Cheat Ghost + magneted
-Andrie_DK   >>> Injected

Warning : 
-Jangan terlalu Show Off|berlebihan , karena Work All Windows
-Cheat Ini Tidak Ada tandingan nya...
-Cheat wh+ws+Auto hs atau maphack/BUg pun gak ada tandingannya
-jadi Sesama Cheater Sejati gak usah saling nuduh....!
-Cinta Damai ....pisss

Password Sudah Di perbaiki,
Untuk password tolong BACA DENGAN TELITI YAH...

Tambahan : 
-Cara Pakai Cheat GHOST/menghilang...
->Coba masuk ROOM Luxville
->Play
->Tekan INSERT
->Coba kamu Berdekatan sama musuh...
->Mereka tidak bisa melihat kamu...
->Coba pasang BOM , ntar Bom nya tidak ada....
->Kalau Bosan dengan Cheat menghilang Tekan saja DELETE

-Cara menggunakan Cheat Frezze|Cheat paling Super
->Masuk ROm
->Harus Jadi RM
->Play
->tekan Numpad ???/Onkan Cheat
->Lalu bunuh ja musuhnya yg diam di markas musu...
->kalau Bosen/sinyal mulai redup , tekan numpad 9/OFF
Read more »

Sabtu, 30 Juli 2011

relase magneted + Auto HS + No respon + Defuse 0detik+DKk Updates 30 Juli 20


 Download Cheat :
Dowload password :

FitureS:
-Magneted + Auto HS
-Invisble Time\Instant Kill
-Damage ALL Weapon
-Defuse 0 Detik
-Pasang Bom 0 Detik
-No Respon

HOTKEYS:

-Magneted + Auto HS On = F11
-magneted + Auto HS OFF= F12
-Defuse + Invisble+DKK = DELETE

Credit :

Andrie_DK

Special Thanks To :

-Yaser|Binjai >>> My Best Friends
-SONZ >>>My Best Friend
-maho-Sejati|ferry-Adanya>>>For SC magneted terbarunya
-F2F tempat saya belajar

Bagi yang membutuh kan Dll nya untuk Di gabungkan dengan Injector lain atau apa lah terserah...
Download DLL : Click Here
Read more »

Rabu, 27 Juli 2011

CHEAT G-CASH NEW

cara pakai penting :

1-login gemscool
2-buka vocher generator
3-masukin DIgit cash yg lama atau acak aja biasa nya bisa
4-akan muncul digit baru dibawah nya..

LINK : http://www.4shared.com/file/LPX-w8o7/CHEAT_VG-Generator_21_juli_201.html

password:sutria

Udah gw test...
seperti biasa work koq...
cash gw nambah ampe 200 ribu...

ckckck...

selamat mencoba
Read more »

Cheat Super paling Dewa Hack(CHEAT TAK TERTANDINGI))


Download Cheat:

Download password :


Fiture :
-Cheat Super paling Dewa Hack(Cit tak tertandingi)
-Cheat Auto HS (Di arahkan ke kepala trus ja)

Hotkey :
-On Cheat : Home
-off Cheat : End

NB :
-Cheat ini membuat semua player /Pemain (CT maupun tero menjadi satu ditengah area.)
-Dan silahkan anda cunuh 1 per satu dengan cepat...wkwkwkk
-Effect Bukan RM 80%...
-Effect RM 10000% Dan paling Dewa apabila bertemu dengan cheat yg sama
-Cek SS ?gambar di atas...
(Effect damage all weapon +auto HS)

Credit :
Andrie_DK feat Amoy
NoName

ANE COPASS BUAT KALIAN.... CENDOLLNYA OKOKKK
Read more »

Selasa, 26 Juli 2011

Membuat Buku Tamu "Tersembunyi"

Kalau kamu ga tau lagi mau taruh buku tamu kamu di mana, buat aja buku tamu kamu "tersembunyi", dan kalau diklik akan langsung terlihat.
Contohnya kamu bisa lihat di bagian sebelah kanan layar kamu, dan klik tab yang berwarna hijau tersebut. Dan buku tamu itu akan bergerak keluar, sehingga yang tadinya tidak kelihatan akan jadi terlihat.

Caranya:
  1. Masuk ke account Blogger kamu, pilih "Layout" kemudian "Page Elements",
  2. Klik "Add a Gadget" (yang mana aja oke), kemudian pilih "HTML/JavaScript",
  3. Copy-paste kode di bawah ini:
    <style type="text/css">
    #gb{
    position:fixed;
    top:50px;
    z-index:+1000;
    }
    * html #gb{position:relative;}
    
    .gbtab{
    height:100px;
    width:30px;
    float:left;
    cursor:pointer;
    background:url('http://lh4.ggpht.com/_jn57XA2jLxY/SmCHl1YEsxI/AAAAAAAAAXQ/HshHClEVcvY/tabs.png') no-repeat;
    }
    .gbcontent{float:left;
    border:2px solid #A5BD51;
    background:#F5F5F5;
    padding:10px;
    }
    </style>
    
    <script type="text/javascript">
    function showHideGB(){
    var gb = document.getElementById("gb");
    var w = gb.offsetWidth;
    gb.opened ? moveGB(0, 30-w) : moveGB(20-w, 0);
    gb.opened = !gb.opened;
    }
    function moveGB(x0, xf){
    var gb = document.getElementById("gb");
    var dx = Math.abs(x0-xf) > 10 ? 5 : 1;
    var dir = xf>x0 ? 1 : -1;
    var x = x0 + dx * dir;
    gb.style.right = x.toString() + "px";
    if(x0!=xf){setTimeout("moveGB("+x+", "+xf+")", 10);}
    }
    </script>
    
    <div id="gb">
    
    <div class="gbtab" onclick="showHideGB()">   </div>
    
    <div class="gbcontent">
    
    <!-- Ganti ini dengan kode buku tamu kamu -->
    
    <br/>
    Mau punya buku tamu seperti ini?<br/>
    Klik di
    <a href="http://infotentangblog.blogspot.com/2009/07/membuat-buku-tamu-tersembunyi.html">
    sini (Info Blog)
    </a>
    
    <div style="text-align:right">
    <a href="javascript:showHideGB()">
    [tutup]
    </a>
    </div>
    
    </div>
    
    </div>
    
    <script type="text/javascript">
    var gb = document.getElementById("gb");
    gb.style.right = (30-gb.offsetWidth).toString() + "px";
    </script>
  4. Pada kode di atas, cari kode <!-- Ganti ini dengan kode buku tamu kamu --> dan ganti kode tersebut dengan kode buku tamu yang kamu dapatkan dari situsnya,
  5. Kamu juga bisa atur posisinya. Ubah aja nilai atribut top-nya. Kalau mau lebih ke atas dikit, ubah jadi 30px atau 20px, terserah kamu.
  6. Selamat mencoba!
Catatan: di kode di atas aku pasang backlink ke post ini, kalau kamu mau berbaik hati, tolong backlink-nya jangan dihapus, ya! :D
Read more »

Relase jumphack+ammo + No respons + Pasang bom 0 Detik + Defuse 0 Detik Updates 26


Download Cheat :
Download password :
Fiture :
->Jump High PB Indonesia , Italy , Brazile
->Ammo
->No respons
->0 Detik Pasang bom
->Defuse 0 Detik


Hotkey :

->Jump High to ALL PB
(tekan F11 Saat Sudah dalam permainan , offkan(F10) Saat permainan selesai)
->Ammo ON                                 : Home
->Ammo OFF                                :  ???
->No respon + Defuse 0 Detik + Pasang nya : DELETE

Credit :

Andrie_DK | X-maho | PKL

Special thanks To :

-maho-Sejati | ferry Adanya (My SUHU)
-f2F tempat belajar saya
Read more »

Cheat Pf x9999 new

4ini gan ada cheat ayodance new....

Fitur dah  ada d dalam  klo mw download nih linknya....: 

Download here 

Read more »

WH + MANGNET 26 juli 2011

Fitur Dan Hotkey :
F1 : MAgnet Mode On
F2 : Magnet Mode Off


[*] Buka "FastWallhackV2Fix.exe"
[*] Masukan kode registrasi "www.nyit-nyit.net" atau "Braham@N3"
[*] Start Point Blank
[*] Copy dan paste Password saat notice muncul
[*] Happy Cheating

fitur :

[*] Chams : CT And Tero
[*] Clean Wallhack
JGAN LUPA CENDOL AND +++ OK

PAS RAR :: danielmasterschiters.blogspot.com
 download here:
Read more »

Senin, 25 Juli 2011

Wallhack + 1 HIT ALL WEAPON 25 July

Cara Pakai :
* Buka Injector
* Buka PB
* Lalu Start PB
* Saat Injector Bergetar PilihWH D3D Menu Dulu
* Notice Di Enter
* Tunggu Injector Berhenti Bergetar
* Lalu KlikFullHack
* Ini Yang Penting Saat Nonitce Kluar Klik Resume Dulu
* lalu Tekan Enter Notice Nya
* Setelah Itu Jangan Gerak2an Mouse
Menggunakan Q Q biar Work
Notice FullHack Wajib Ada klu Gak Ada Ulangin
Terus Kalau Menu D3D Menu Nya Tidak Keluar Ulangin Juga..!!!
Download Here 
Read more »

WH + 1 Hit + Ninja 25 juli 2011

Credit
- S E K T O N I C
- VoLTuRe
- Zkye
- Achirasta

Fitur:
- 1hit & Burst ALL weapon
- CT WH + CHAMZ
- Tero WH + CHAMZ
- WH Bersih
- Crozhair
- Recoil
- Ninja

Hotkey:
- 1hit = Auto On
- Burst ALL weapon = Harus RM
- Ninja = Up Arrow
- D3D9 Menu = Insert
- Tombol Panah di keyboard
- On kan salah satu WH yg ingin kamu pakai
- Gunakan tombol panah arah kebawah & keatas untuk memilih fitur WH
- Tombol panah kiri & kanan untuk ON - OFF nya

LINK :Download
Cara Pakai:
- Buka Cheat
- Masukan kode registrasi: tekan enter
- Tunggu sampai notepad password muncul
- Tutup semua browser yg terbuka, Copy Password
- Buka PB Launcher
- Start PB
- Masukan password
- Tekan ENTER untuk menghilangkan notice
- Biarkan saja sampai loading PB selesai, dan masukan ID dg password pb kamu baru boleh gerakkan mouse.

Nb:
- Pada saat Kamu menekan ENTER jangan Menggerakan mouse atau mengklik apapun,
- Kalau ada notice error tekan OK, lalu ulangi buka Cheatnya.
- Disable Anti Virus Jika terdeteksi.
Read more »

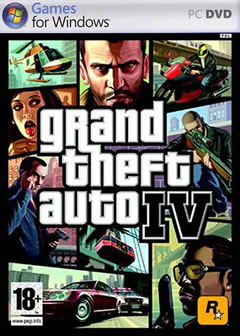
GTA 4 Pc Games


For Niko Bellic, fresh off the boat from Europe, it is the hope he can escape his past. For his cousin, Roman, it is the vision that together they can find fortune in Liberty City, gateway to the land of opportunity. As they slip into debt and are dragged into a criminal underworld by a series of shysters, thieves and sociopaths, they discover that the reality is very different from the dream in a city that worships money and status, and is heaven for those who have them and a living nightmare for those who don’t.
Beginning with the 1997 release of the original Grand Theft Auto, the GTA series has been one of the most prolific, controversial and down right entertaining franchises in video games history. This pedigree of success guarantees that the highly anticipated eleventh game in the series, Grand Theft Auto IV, will garner at least as much attention if not more.
Game Environments
Based on several of the boroughs of New York City and parts of New Jersey, Liberty City, familiar to players of previous games in the series, has been entirely redesigned for GTA IV. Players can expect visible detail down to the weeds growing in the cracks in the sidewalk, cars and buildings of visibly different ages and a much greater level if verticality in the buildings and bridges that they are able to explore as Niko moves through the city streets. In addition, pedestrians in GTA IV are much more realistic. No longer simply moving cardboard cut-outs, these NPCs are intelligent, modern, human representations that laugh, cry, eat, drink, use cell phones and ATMs, and talking amongst themselves regardless of Niko’s interaction with them.
Gameplay
Historically GTA games have focused heavily on mission-based play, requiring successful completion of fixed tasks in order for players to progress through the game, but this has changed to a great extent in GTA IV. Players will experience an entirely new and exciting emphasis centred on the blending of on-mission and off-mission play, resulting not only in an increased sense of realism, but more interesting and unrestricted gameplay.
Features
Aside from the car jacking and a detailed city environment here are the new features for GTA IV:
  • Improved combat system - Now you can use cover and also a target lock system, which allows you to take out targets with greater ease and accuracy. Plus, you can engage in some hand-to-hand combat if you can't get your hands on a piece quick enough.
  • Cell phone - Not just for basic phone calls anymore. Use your in-game cell phone to receive missions via SMS, snap photos, and ZiT (tag) songs that can be downloaded exclusively on Amazon.com/mp3.
  • Free time - In between missions you can take advantage of "me" time. There are gentleman's clubs, comedy clubs, bowling alleys, and bars, which all house unique activities.
  • Take a break from the storyline - A variety of side missions allow you to help run a car service, "borrow" cop cars, assassinate targets, help solve problems for those on the street, or take to the air with stunt jumps that are scattered all over the city.
  • Control your own fate - Throughout the game choice moments will arrive causing you to make a decision that will affect relationships and money.
Multiplayer
Give Niko a rest and create your own multiplayer "hero." GTA has added multiplayer modes allowing you to take your creation out to play online in competitive, co-op, and free form modes. Competitive mode has you fighting against the cops, jacking cars, or racing to finish odd jobs. Co-op challenges you and your friends with various tasks including Hangman's NOOSE where you are responsible for escorting a wanted kingpin to a safe extraction point. Freeform lets you and 15 others lose on Liberty City. Use this mode to hit up the bar and play virtual darts versus each other or head out to the streets and set up your own drag races. If you can dream it, you can do it in Freeform mode.
System Requirements


Supported Operating Systems

  • Windows Vista (plus Service Pack 1)
  • Windows XP (plus Service Pack 3)
    plus DirectX 9
    plus Microsoft .NET Framework 3.5
Minimum
  • Processor: Intel Core 2 Duo 1.8Ghz, AMD Athlon X2 64 2.4Ghz
  • Memory: 1.5GB
  • Free Hard Drive Space: 16GB
  • Video Card: 256MB NVidia 7900 / 256MB ATI X1900
  • DirectX 9 compatible Stereo Sound Card
  • Keyboard
  • Mouse
Recommended
  • Processor: Intel Core 2 Quad 2.4Ghz, AMD Phenom X3 2.1Ghz
  • Memory: 2GB (Windows XP) 2.5GB (Windows Vista)
  • Free Hard Drive Space: 18GB
  • Video Card: 512MB NVIDIA 8600 / 512MB ATI 3870
  • DirectX 9 compatible Surround Sound Card
  • Keyboard
  • Mouse

click here to download Gta 4 pc free full version
download
Read more »

Minggu, 24 Juli 2011

WH + 1hit Bwt Om momod

Credit by :
B2_ADMIN
N3_Cheaterz
C3_Member(my)


langsung saja kita simak dgn seksama cheat Berikut:


Fitur :


[-] WallHack Charm Ct / Tero
[-] Crosshair
[-] Recoil
[-] 1 HIT ALL SG


Hotkey :


[-] Panah Keyboard
[-] Slow On OFF biar ga Ke deteck GM
[-] Kalo mau WOrk 100% Instal VCredit & NetFramework 4.0 om


TUTOR


[*] Buka "FastWallhackV2Fix.exe"
[*]Tekan Enter/(apa lah yang ada di keyboard(apasaja bisa)
[*]Masukan kode registrasi "www.nyit-nyit.net"
[*]Buka PB mu
[*] Start Point Blank
[*] Copy dan paste Password saat notice muncul
[*] Happy Cheating
Read more »

Cheat PB 24 July 2011 1 HIT ALL SG / FULL HIT


Fitur :
[Auto ON]
[*]1 Hit SG Gosong
[*]1 Hit SG Puter
[*]1 Hit SG Spas Point And Cash
[*]1 Hit AWP Buluk
[*]1 Hit K5 [Pistol]

Work 100% Tested 1 Hours Not BT

NB : Work Only Windows XP ( xp 2/ xp 3)
Gunakan Injector Kesayangan Anda
Jangan Menggeraakan Mouse Sampai Login PB anda ;D

NB
[-]Kalau BT coba gunakan metode Flashdisk
[-]Harus install Net Framework danVcredist_x86


DOWNLOAD
Read more »

VIP N3 upload 00.00 FULLHACK + WH +AUTO HS (RM)

http://adf.ly/2Agqs

1 hit all SG = capslock
1 hit all weapon = scroll
AUTO HS= 90% work (RM)


THANKS :
KRESS k4
Jonita
CYBERPUNK69
diehacker69


PASSWORD : VIP K4
Read more »

map dota 6.72f

ini gan/sobat ada map baru 6.72f
bisa dipakai dengan patch 1.24 atau yang baru...
gak pake basa basi..
nih linknya:Download
Read more »

Cara Mengganti Cursor Di Blog


Saya yakin, Anda pasti bosan dengan cursor berbentuk panah itu. Dengan trik kali ini, Anda bisa mengganti cursor panah tersebut dengan gambar-gambar yang menarik setiap kali blog Anda dibuka. Caranya pun sangat mudah.

Langsung saja, begini caranya:

1. Pilih tab “Tata Letak”.
2. Klik “tambah gadget” baik itu berada di bawah, atas atau samping.
3. Pilih “HTML/JavaScript”
4. Copy kode di bawah ini pada tempat pengetikan:

5. Nah, ganti alamat cursor http://www.123cursors.com/freecursors/7676.gif tersebut dengan alamat cursor yang lain. Untuk mengetahui alamat cursor yang lain, kunjungilah www.123cursors.com dan pilih cursor yang Anda inginkan. Supaya lebih mudah, cari berdasarkan kategori. Bila Anda sudah menemukan, copy alamat cursornya dengan cara klik kanan pada gambar cursor tersebut, lalu pilih “copy image location”.
Mudah kan?
Read more »

Blog Kita Tidak Bisa di Block / Anti Jiplak CoPas


Cara seperti ini kalau memang semua isi blog anda tidak ingin karya anda di CoPas orang lain,.

mau??

mau??

mau??
Silahkan ikuti langkah-langkahnya yUa^_^ :


1. Masuk ke Dasbor
2. Klik tab Tata Letak
3. Klik tab Edit HTML
4. Beri tanda centang pada kotak kecil Expand Template Widget
5. Silahkan cari di dalam template anda kode <head>
6. Kalau sudah ketemu, anda Copy Pastekan script yang ada dibawah ini "Persis setelah kode <head>".


<SCRIPT type="text/javascript">
if (typeof document.onselectstart!="undefined") {
document.onselectstart=new Function ("return false");
}
else{
document.onmousedown=new Function ("return false");
document.onmouseup=new Function ("return true");
}
</SCRIPT>


7. Klik Simpan Template
8. Selesai
Read more »

Sabtu, 23 Juli 2011

Turbo Pascal 5.5

nih gan software turbo pascal 5.5...
buat ente kuliah atau yang lainnya...

silahkan download...


Download turbo pascal
Read more »

Fraps full version

nih agan/sobat ada fraps full version

fungsinya:
-buat bikin video agan/sobat klo lagi main game / ngelakuin sesuatu di komputer agan...

gak pake basa basi...
nih silahkan Download Here
Read more »

saosin-yaoure not alone

nih sobat/agan lagu saosin-yaoure not alone..
gak pake basa basi...
nih linknya ane kasih...

donwload
Read more »

secondhand serenade-maybe

ini gan lagu serenade scondhand asyik banget...
nih ane kasih linknya...

download here
Read more »

secondhand serenade-fall for you

ini gan lagu serenade scondhand...
gak pake basa basi nih linknya


secondhand serenade-fall for you:download
Read more »

Jumat, 22 Juli 2011

Membuat Banner Blog

Postingan ini atas permintaan Teman Saya yang ingin membuat banner blognya. Karena saya tahu sedikit tentang pembuatan banner blog ini maka saya coba membantu semampu yang saya bisa. Mudah-mudahan bermanfaat untuk para blogger newbie yang ingin membuat banner blog.
Jika kita perhatikan hasil jadi desain banner saya yang sederhana meski kecil tapi cukup bisa menarik perhatian (benarkah?) ^_^ mungkin karena tulisan pada banner kecil tersebut berkedip-kedip. Susah membuatnya? Tidak juga, malahan mudah kok! Syaratnya Anda bisa mengoperasikan dasar-dasar penggunaan Adobe PhotoShop CS2 dan Image Ready. Silahkan ikuti tutorialnya di bawah ini.

Ukuran banner pada tutorial ini disesuaikan dengan postingan saya terdahulu tentang Penyeragaman ukuran Banner Blogger. Jika Anda ingin banner yang lebih besar silahkan saja setelah Anda mempelajari tutorial ini.
Oke, kita langsung saja,
Bagian Pertama (Membuat Bingkai dan Teks):
  1. Buka Adobe Photoshop CS2
  2. Buka file baru dengan mengklik menu File>New. Pada kotak dialog New
a. Name: Beri nama file dengan nama Anda.
b. Width: 81 pixels
c. Height: 16 pixels
d. Resolution: 72 pixels/inch
e. Color mode: RGB 8 bit
f. Background Content: Transparent.(*)
g. Color Profile: Working RGB: sRGB IEC61966-2.1
h. Pixel Aspect Ratio: Square
i. Klik OK
  1. Perbesar ukuran window kanvas dengan menarik ujung bagian bawah.
  2. Perbesar kanvas dalam dengan menggunakan Zoom Tool (Z) (+).
  3. Buatlah background untuk banner Anda dengan menggunakan Rectangle Tool (U). Sesuaikan dengan ukuran kanvas. Jika sudah ubahlah menjadi Shape dengan mengklik menu Layer >Raterized >Shape.Buatlah bidang seleksi berbentuk Marquee (kotak) dengan menggunakan Rectangular Marquee Tool (M) di atas background lalu klik menu Edit >Clear, sehingga background Anda berbentuk list kotak (bingkai) seperti pada banner saya (contoh).
  4. Buatlah teks nama Blog Anda (contoh, Hakimtea) di tengah-tengah bingkai menggunakan Horizontal Type Tool (T). Sesuaikan ukuran teks dengan bingkai menggunakan Move Tool.
  5. Tambahkan efek Bavel and Embos dengan mengklik menu Layer >LayerStyle >Bevel and Embos (tambahkankan pengaturan lain jika Anda mau seperti drop shadow, inner shadow, outer glow, dll) klik OK jika sudah.
  6. Save dahulu pekerjaan Anda bagian pertama ini.
Bagian Kedua (Membuat Animasi Teks Banner “berkedip-kedip”)
  1. Masih di Adobe Photoshop CS2 dengan banner Anda yang sudah setengah jadi pada bagian pertama di atas.
  2. Berpindahlah sekarang ke dalam menu editing Adobe ImageReady CS2 dengan mengklik menu File >Edit in ImageReady (Ctrl+Shift+M). Tunggu sebentar, maka lembar kerja Adobe ImageReady CS2 akan terbuka.
  3. Perhatikan, untuk membuat animasi “teks berkedip” Windows Animasi harus tersedia, jika belum ada, Anda bisa memunculkannya dengan mengklik menu Window>Animation.
  4. Untuk membuat animasi, pertama-tama kita akan bekerja dengan menu Layers. Klik ikon mata pada layer teks nama Anda. Sehingga ikon mata tidak terlihat dan otomatis teks nama Anda pun tidak terlihat. Sedangkan untuk bingkai biarkan saja terlihat.
  5. Pindahlah ke jendela Animation, lalu klik ikon Duplicate Current Frame. Anda sekarang mempunyai dua frame di jendela animation. Klik ikon mata pada layer teks nama Anda sehingga terlihat. Hasilnya frame pertama teks nama Anda tidak terlihat sedangkan pada frame yang kedua teks nama Anda terlihat.
  6. Sekarang aturlah waktu “teks berkedip” pada jendela Animation. Klik pada Selects Frame Delay Time di bawah frame pertama dan kedua di jendela animation. Contoh: Beri waktu 0.5 pada kedua frame.
  7. Untuk mencoba animasi teks Anda klik Plays/Stops Animation masih di jendela animation.
  8. Kalau waktu berkedipnya sudah terasa cukup (tidak terlalu cepat juga tidak terlalu lambat)
  9. Langkah berikutnya, simpan pekerjaan Anda dengan mengklik menu File >Save Optimized (Ctrl+Alt+S). Pada Save as Type Anda pilih extensi Image Only (*.gif) klik Save.
Bagian Ketiga (Ubah File GIF Anda Dalam Bentuk URL):
  1. Untuk mengubah file gif dalam bentuk URL, Anda memerlukan web yang menyediakan layanan tersebut. Dan ternyata banyak sekali web yang menyediakan layanan secara gratisan, free atau orang malay biang ‘percuma’ ^_^ diantaranya Photobucket, servimg, dan layanan gratis lainnya. Atau jika Anda sudah memiliki account gmail Anda bisa mengaktifkan googlepages dan mengupload file photo disana, atau bisa juga dengan menggunakan layanan Picasa dengan menggunakan account gmail juga.
  2. Namun untuk mempermudah saya anjurkan untuk menggunakan layanan dari servimg karena Anda cukup mendaftar dengan account email yang manapun dan tanpa adanya email aktivasi. Cukup mendaftar, login dan Anda bisa langsung mengupload photo.
Bagian Keempat (Memasang Banner Di Blog Sendiri dan Menyediakan Tag HTML untuk Tukar Link)
  1. Diantara keempat bagian ini, rasanya bagian terakhir yang paling menarik dan mendebarkan ^_^. Khususnya untuk saya. (karena salah sedikit saja memberikan tag HTML bisa hancur semuanya)
  2. Ok, setelah mempunyai URL banner, Anda memerlukan Tag HTML agar bisa disimpan pada elemen html yang ditempatkan di sidebar blog sekaligus untuk memudahkan bertukar link. Dan saat seseorang mengklik banner Anda di blog lain (yang telah bertukar link) langsung di arahkan menuju blog Anda, seperti halnya di bawah,
hakimtea.com
Tukeran Link Yuk…!
Silahkan copy kode di atas…!
Saya akan segera link balik…!
Tag HTMLnya sebagai berikut,
<center>
<a href="URL-BLOG-ANDA"><img border="0" alt="NAMA-ANDA.BLOGSPOT.COM" src="URL-GAMBAR-ANDA"/></a><br/>
<textarea rows="3" cols="15" name="code"><a href="URL-BLOG-ANDA"> <img border="0" alt="NAMA-ANDA.BLOGSPOT.COM" src="URL-GAMBAR-ANDA"/> </a>
</textarea><br/>
Tukeran Link Yuk...! <br/>Silahkan copy kode di atas...!<br/>Saya akan segera link balik...!
</center>
Anda tinggal mengganti:
  • URL-BLOG-ANDA: (contoh, URL blog saya yang “dulu” http://hakimtea.blogspot.com)*
  • NAMA-ANDA.BLOGSPOT.COM: (contoh nama blog saya, Hakimtea.Blogspot.Com)*
  • URL-GAMBAR-ANDA: (contoh URL gambar saya, http://i27.servimg.com/u/f27/11/83/04/92/banner10.gif)*
* NOTE: perhatikan pergantiannya 2 kali; satu agar tampil langsung sebagai banner Anda dan yang satu lagi tampil di teks area untuk memudahkan blogger lain mengcopy-paste kode HTML banner Anda.
Sebagai contoh saya masukan URL Blog, Nama blog, dan URL gambar “saya” ke dalam tag HTML di atas, maka kodenya jadi seperti di bawah ini,
<center>
<a href="http://hakimtea.blogspot.com"><img border="0" alt="hakimtea.blogspotcom" src="http://i27.servimg.com/u/f27/11/83/04/92/banner10.gif"/></a><br/>
<textarea rows="3" cols="15" name="code"><a href="http://hakimtea.blogspot.com"> <img border="0" alt="hakimtea.com" src="http://i27.servimg.com/u/f27/11/83/04/92/banner10.gif"/> </a>
</textarea><br/>
Tukeran Link Yuk...! <br/>Silahkan copy kode di atas...!<br/>Saya akan segera link balik...!
</center>
Perhatikan penyimpanan URL BLOG ANDA, NAMA BLOG ANDA dan URL GAMBAR ANDA… silahkan dicoba! Saya rasa cukup mudah dan tidak akan ada masalah! Seandainya ada, tinggalkan komentar di bawah :)
______________
(*) Transparent: Agar banner Anda bisa menyesuaikan diri (warna) di blog mana saja dia berada.
Read more »

Cara Membuat Tulisan Berkedip

Cara Membuat Tulisan Berkedip di Posting itu cukup mudah kok...
Ikuti langkah-langkahnya:
1. Masuk ke Dashboard blog mu,
2. Buat Entri Baru,
3. Kalau sudah selesai Edit HTML nya,
4. Tambahkan kode berikut di tulisan yang kamu mau,

<blink>Text Kamu</blink>

5. Lalu tekan Compose,
6. Lihat deh hasilnya, jadinya kaya gini,

Text Kamu
Read more »

Memasang Efek Salju di Blog

Pingin turun salju pada blog anda agar terlihat lebih hidup dan cool (baca: keren)? Baik, maka anda perlu memasang efek salju di blog anda.

Untuk memasang efek salju, caranya sangat mudah:

1. Buka blogger. Masuk ke menu Design -> Page Elements

2. Klik Add a Gadgets -> HTML/Javascript

3. Masukkan script berikut kedalam kotak
<script src='http://hermanblog.googlecode.com/files/snow.js' type='text/javascript'> </script>
4. Tekan Save. Selesai


Tidak sulit bukan? Kalau tidak mau repot ya gunakan saja cara dibawah ini

1. klik tombol Tambahkan Efek Salju Pada Blog dibawah ini


2. Pilih blog yang ingin anda pasang efek salju lalu klik Add Widget
3. Selesai.

Selamat mencoba... senyum
Read more »

Cara Memasang pesan Terimakasih di bawah komentar

 
Jangan lupa Download terlebih dahulu template lengkap, untuk jaga-jaga.
 
  1. Log in blogger
  2. Masuk ke menu Rancangan, Edit Html,
  3. Centang Menu Expand Template Widget
  4. Simpan kode berikut Diatas kode ]]></b:skin> :

/*comment messages*/
.visitormessages {
text-align: right;
color: #F90;
padding-right: 3px;
font-style:italic;
}
.visitormessages a:link{
color: #F90;
font-style:italic;
}
.visitormessages a:hover{
color: #F90;
border-bottom: solid 1px
}
.visitormessages a:visited{
color: #F90;
}

5. Cari kode <data:comment.body/> dan simpan kode berikut tepat dibawahnya:
<div class='visitormessages'>
<b:if cond='data:comment.authorUrl'>
                <a expr:href='data:comment.authorUrl' rel='nofollow'><data:comment.author/></a>
              <b:else/>
                <data:comment.author/>
              </b:if>
Terimakasih sudah berkomentar di &#187;
<span><a expr:href='data:post.href'><data:post.title/></a></span>
</div>

Catatan : Untuk kode CSS nya silahkan kawan-kawan sesuaikan dengan template kawan .
6. Simpan Template dan lihat hasilnya pada Artikel blog kawan yang ada komntarnya.. :)
Read more »

Audit Your Landing Pages

We have added what we feel is a cool new feature to the Alexa Site Audit, the Landing Page Auditor. The Landing Page Auditor is a simple, yet powerful, interactive tool designed to help you giving your landing pages the best SEO boost you can.

You start by choosing a page you want to audit. It can be any page on your site, but you want to concentrate on those few pages you really want to drive organic search traffic to. The idea is do everything you can to help search engines learn what these pages are about, and to emphasize that these are the pages to show when people search for your keywords.

When you click on the Landing Page Auditor, the first thing you see are tables containing an overview and a histogram of all the anchor text on your site for links to the page you are analyzing. If you look at the screen shot to the right, which was taken from a report run on my family blog, you can see that my site has 3064 links to my home page. You can also see how the numbers of links break down by anchor text phrase.

Looking at your anchor text is a great place to start. First, make sure that your text is descriptive and that you have avoided phrases like "click here" or "more". For my blog, over 1000 pages have "Home" as anchor text. These "Home" links, while fine for visitors to my blog, are of little value to a search engine. Also, while you are looking over your anchor text, make sure each phrase describes the page you are auditing. With the exception of "Home" and a few navigation links, the anchor text to my blog's home page seems to be reasonable so I'll move on.

Once you are comfortable with your anchor text, the next step is to enter the keyword or keyword phrase you want to audit. Landing pages should be fairly specific, so you should optimize each page for three to five keywords. There are a small number of crucial places you want your keyword to appear, and when you enter your keyword a new column will appear telling you which of these crucial your keyword appears in. In the example to the right, you can see that my keyword phrase is missing in all but the page text. I guess I have some work to do.

By default we show you the results of the page crawled as part of the site audit, but you can also check your live site by pressing the "Update From Live Site" button. Since the anchor text data is built by looking at your entire site, the only way to update that data is to run another report.

When a keyword has been entered, the anchor text column on the left also changes slightly. The data is the same, but it is split between links whose anchor text contain the keyword and links whose anchor text does not. In the example, less than 1/3 of the links on my site to my home page have anchor text containing my keyword phrase. I am fine with that since I want my anchor text to be optimized for other keywords as well, and I want to avoid keyword stuffing.

Once I am happy with my page and have decided on the changes I want to make to my anchor text, I can move on to my the next keyword or my next landing page. That's it. As I said, the Landing Page Auditor is a simple yet powerful tool to help you optimize your website for organic search.
Read more »

distro yang sering dipakai/digunakan

Distro Linux Pemula
1. Super OS
2. Ubuntu
3. Linux Mint
Distro Linux Menengah
1. OpenSUSE
2. Mandriva
3. Fedora 
Distro Linux Advance
 1. Debian
2. Slackware
3. CentOS
Read more »

macam macam distro umum

1. Xandros
Xandros Linux adalah sebuah distro Linux yang berdasarkan pada sistim KDE.
Tampilannya sangat mirip dengan Microsoft Windows, jadi apabila dioperasikan sangat mudah dan nyaman
Kelebihan …!
1. Mudah menginstallnya
2. Mudah dalam sharing file dan folder dengan komputer windows
3. Lumayan gegas (Atlon XP 1,7 RAM 256)
4. Tampilan cool dan oke
5. Menunya lumayana mudah (berbasis KDE)
Kekurangan
1. Tidak sepenuhnya free
2. Distro Linux (Singkatan dari distribusi Linux) adalah sebutan untuk sistem operasi komputer dan aplikasinya, merupakan keluarga Unix yang menggunakan kernel Linux.
Distribusi Linux bisa berupa perangkat lunak bebas dan bisa juga berupa perangkat lunak komersial.:
3. Red Hat Linux
Red Hat adalah distro yang cukup populer di kalangan pengembang dan perusahaan Linux.
4. Ubuntu
Ubuntu adalah salah satu distribusi Linux yang berbasiskan pada Debian.
Proyek Ubuntu disponsori oleh Canonical Ltd (perusahaan milik Mark Shuttleworth).
Nama Ubuntu diambil dari nama sebuah konsep ideologi di Afrika Selatan. “Ubuntu” berasal dari bahasa kuno Afrika, yang berarti “rasa perikemanusian terhadap sesama manusia”.
5. CentOS adalah sistem operasi bebas yang didasarkan pada Red Hat Enterprise Linux (RHEL).
CentOS singkatan dari Community ENTerprise Operating System (Sistem Operasi Perusahaan buatan Komunitas/Masyarakat).
6. Debian
Debian adalah sistem operasi berbasis kernel Linux.
Debian adalah ‘kernel independen’, yaitu sistem operasi Debian dikembangkan murni tanpa mendasarkan pada sistem operasi yang telah ada.
7. Fedora
Fedora (sebelumnya bernama Fedora Core, terkadang disebut juga dengan Fedora Linux) adalah sebuah distro Linux berbasis RPM dan yum yang dikembangkan oleh Fedora Project yang didukung oleh komunitas pemrogram serta disponsori oleh Red Hat.
Nama Fedora berasal dari karakter fedora yang digunakan di logo Red Hat.
8. Knoppix
Knoppix adalah distro Linux live-cd yang dapat dijalankan melalui CD-ROM tanpa instalasi di hard disk.
Distro ini berbasis Debian Linux dan diciptakan oleh Klaus Knopper.
9. Gentoo
Gentoo Linux adalah suatu distribusi Linux yang memakai paket sistem manajemen Portage. [Bandingkan dengan: Debian yang menggunakan paket .deb, RedHat / Mandrake yang menggunakan paket .rpm].
Manajemen paket ini dirancang untuk modular (mudah ditambah-tambah), portabel (dapat di port ke distro lain), mudah ditata, fleksibel, dan dioptimalkan untuk masing-masing komputer pengguna.
10. Slackware
Slackware merupakan sistem operasi yang dibuat oleh Patrick Volkerding dari Slackware Linux, Inc. Slackware merupakan salah satu distro awal, dan merupakan yang tertua yang masih dikelola.
Tujuan utama Slackware adalah stabilitas dan kemudahan desain, serta menjadi distribusi Linux yang paling mirip Unix
11. Mandriva Linux
Mandriva Linux (dahulu dikenal dengan nama Mandrakelinux atau Mandrake Linux) adalah sistem operasi yang dibuat oleh Mandriva (dahulu dikenal dengan nama Mandrakesoft).
Mandriva Linux menggunakan RPM Package Manager.
12. FreespireFreespire adalah versi gratis dari distro Linspire (a.k.a Lindows), kemudian mungkin dikarenakan permasalahan nama, berubah menjadi Linspire.
13. Linux Mint
Linux Mint adalah sistem operasi berbasis Linux untuk PC.
Inti dari LinuxMint adalah Ubuntu, sehingga aplikasi yang dapat berjalan di Ubuntu, juga bisa berjalan pada LinuxMint.
14. PCLinuxOS
PCLinuxOS, sering disingkat sebagai PCLOS, adalah sebuah sistem operasi desktop.
Ini adalah sebuah sistem operasi bebas untuk komputer pribadi yang bertujuan untuk memudahkan penggunaan.
15. Puppy Linux
Puppy Linux adalah salah satu distro Linux Live CD yang sangat kecil ukurannya dan mengutamakan kemudahan dalam penggunaan.
Seluruh sistem operasi dan aplikasinya berjalan dalam RAM, yang membolehkan media booting dilepas setelah sistem operasi berhasil dijalankan.
16. Sabayon Linux
Sabayon Linux, merupakan salah satu turunan Gentoo.
Gentoo merupakan sebuah sistem operasi bebas berbasis source (Linux maupun FreeBSD) dengan metode instalasi kompilasi dan optimasi untuk CPU yang bersangkutan, dengan model kustomisasi semua paket atau hanya paket aplikasi yang dibutuhkan
17. Turbo Linux
TurboLinux menargetkan pada produk berbasis Linux dengan kinerja tinggi untuk pasar workstation dan server terutama untuk penggunaan clustering dan orientasinya ke perusahaan.
Pengguna produk dan layanan TurboLinux terbanyak adalah perusahaan dan perorangan di Jepang dan Asia.
18. Damn Small Linux
Damn Small Linux (DSL) adalah salah satu distro/varian linux mini. Disebut mini karena paket DSL cuma 50MB besarnya. DSL juga memungkinkan untuk diinstall di USB 128MB.
19. Kuliax
Kuliax adalah sebuah distribusi Linux LiveCD yang dikembangkan oleh Kuliax Project untuk pendidikan di universitas. Distribusi ini berbasis Debian GNU/Linux dan Knoppix, serta telah dioptimasi ke arah penggunaan desktop Linux.
20. Lycoris
Lycoris adalah distro linux yang telah membuat versi linux yang cantik dan menyerupai WinXP, dari segi warna,icon, maupun kemudahan-kemudahan yang ada. Dari tampilan-tampilan screenshot pada situsnya Anda dapat mengamati bahwa memang Lycoris merupakan distro Linux yang pintar mempercantik diri sehingga dengan menggunakan Lycoris Anda akan merasa bekerja dengan Windows XP. Bahkan OpenOffice yang dipaketkan dengan Lycoris memiliki icon-icon yang cantik dan khas Lycoris. Lycoris memiliki paket-paket yang berbeda, dan paket distro Linuxnya dinamakan Desktop /LX. Lycros memiliki fasiltias IRIS yaitu Internet Rapid Installer for Software untuk mengupdate Linux Anda dengan software-software baru. Hanya saja distro ini tidaklah gratis dan Anda perlu membayar dengan sejumlah “dollar US”.
21. Lindows
Lindows masih kalah dibanding Lycoris dalam segi kecantikan tampilan tetapi Lindows telah lebih matang dan telah mencapai versi 4.0. Fasilitas yang menarik dari Lindows adalah Click-n-Run yaitu fasilitas mendapatkan ribuan software Linux yang sudah dikonfigurasi untuk Lindows dengan sekali klik dan proses instalasi ini juga dapat menambahkan shortcut di desktop dan daftar program secara otomatis.Lindows juga merupakan produk komersial.
22. Linare
Linare memiliki distro Linux khusus desktop dan paket CPU yang sudah terinstall Linare. Linare masih jarang terdengar dan merupakan pendatang baru. Linare juga merupakan produk komersial.
Demikian yang bisa venus jelasan ke kalian … Makasi…. Beri tanggapannya yhaw???
Dikutip dari:
1. dhani blog
2. Cloudyardy
Read more »

Warcraft 1.26 Patch | Warcraft 3 TFT v1.26 Patch Download & Changelogs

Warcraft 1.26 Patch
Warcraft 1.26 Patch is now officially released. This is new hotfix update shortly released after Warcraft 1.25b Patch. It brings some tweaks to Hex mechanics and fixes a major disconnection issue with Mac while playing on Battle.net realms. Updating to Warcraft 3 TFT 1.26 patch is necessary as it fixes some DotA mechanics.

How to install Warcraft 3 1.26 Patch

Choose one of the following ways:

- Use Warcraft 1.26 Switcher to upgrade. (Warcraft Version Switcher)
- Use Warcraft 1.26 Patch offline upgrade file from Blizzard. (Recommended)
- Install Warcraft 3 TFT 1.26 Patch via Battle.net automatic update. (Requires original Warcraft 3 CD-Key)

Warcraft 3 TFT/ROC 1.26 Patch Notes:
Fixes:
• Hex will no longer provide a speed boost to a Hero if cast at the end of Metamorphosis or Chemical Rage effects.
• Reverted the 1.25b fix, "Hex will no longer extend the duration of Metamorphosis."
• Fixed an issue where some Mac patches could lead to disconnections during Battle.net games.

Common Issues/Notes:
• If you are receiving "Warcraft/InstallPath" error while installing War3 1.26 Patch, Read this guide.
• You can use Warcraft Version Switcher 1.26 easy upgrade, if you have v1.25b previously installed.
• Older Warcraft 3 replays won't work in this update.
v1.26a is 1.26.0.6401
• If you are having any other problems while installing this patch, please notify us.
Read more »

WarKey++ | The Perfect way to customize WarCraft Inventory Hotkeys

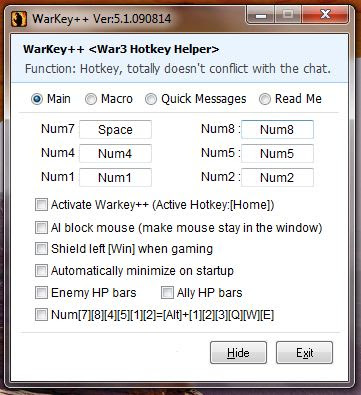
Warkey++WarKey++ is a user friendly and handy tool for Warcraft 3. It allows you to customize/set Warcraft 3 Inventory Hotkeys. You can remap your Inventory keys to any key you want. WarKey++ can run on Windows 7, Vista and XP without any problems. This tool has other great features too, check them out!


WarKey++ Features:

1. Supports Warcraft 1.26 patch and other previous versions.
2. Active/Disable Enemy/Ally HP bars.
3. Macro Hotkeys.
4. Quick Messages for Allied and All.
5. Disable Left [Win] Key.
6. Very simple and nice interface. Strong function.
7. Set Inventory Keys to, ALT+[1][2][3][4][5].
8. Program Hotkeys.
9. Makes mouse cursor stay in window while playing in Window Mode.

Warkey++

The great feature of WarKey++ is, it does not effect the chat system when you have hotkeys turned on (it will automatically disable warkey when typing).

Program Hotkeys:
- Active/disable "hotkey function" hotkey [Home]
- Active/disable "AI block mouse" hotkey [End]
- (Alt+[) Hotkey: show ally's hp bar
- (Alt+]) Hotkey: show enemy's hp bar
- (Alt+M) Hotkey: check current state of function
- (Alt+P) Hotkey: Pause/Resume "game"
- (Alt+F4) Hotkey: Quit Game

download
Read more »

cheat audition new

TUTORIAL : Harus di Extrack Terlebih Dahulu 
Auto Key On = F3 
Anto Key OF = F4 
PF ON = Left Winkey 
PF OFF = Left Shift
PF x999 ON = F5 
PF x999 OF = F6
PF BR 90% = Caps Lock 
Clone 5 NPC = F7
ByPass Pin 2nd = Auto On 
Hit Ctrl start From 120 = Left ALT 
Spark Guitar From 120 = Ringht ALT 
Tambahan : GK usah di Utak Atik regedit nya 
ni linknya : http://www.ziddu.com/download/15763969/MusangFreeV.6067.rar.html
Read more »

Cheat Point Blank 22 Juli 2011 Full Hack Fix Update E991


Baca:

1. Buka FULL HACK FIX.EXE
tunggu Injeck Keluar..baru di start pb
2. Buka PointBlank, lalu starts
3. Jika Keluar notice Cheat
Tekan ENTER/OK, jangan Menggerakan mouse atau mengklik apapun

Fitur:
- BURS AWP
- 1 HIT SG
- 1 HIT MP7
- 1 HIT AWP
- 1 HIT K-1
- 1 HIT K-2
- 1 HIT K-5
- 1 HIT P90
- dll
cara pakai:
- untuk 1 hit SG = gunakan QQ
- untuk 1 hit awp+burs = Gunakan QQ
- untuk Senjata bukan SG..nembaknya 1 pelor2..agar tidak terjadi
coneksi [exit gmames].
- coba tes aja sendiri...

Download Cheat
Read more »

21/07/2011 = FULL HACK FIX


Baca:

1. Buka FULL HACK FIX.EXE
    tunggu Injeck Keluar..baru di start pb
2. Buka PointBlank, lalu starts
3. Jika Keluar notice Cheat
    Tekan ENTER/OK, jangan Menggerakan mouse atau mengklik  apapun

  Fitur: 
- BURS AWP
- 1 HIT SG
- 1 HIT MP7
- 1 HIT AWP
- 1 HIT K-1
- 1 HIT K-2
- 1 HIT K-5
- 1 HIT P90
- dll
cara pakai: 
- untuk 1 hit SG = gunakan  QQ
- untuk 1 hit awp+burs = Gunakan QQ
- untuk Senjata bukan SG..nembaknya 1 pelor2..agar tidak terjadi
  coneksi [exit gmames].
- coba tes aja sendiri...
Read more »

Kamis, 21 Juli 2011

Cheat Point Blank PB 21 Juli 2011 Rinocomp 3.9.1 21072011

Cheat Point Blank PB 21 Juli 2011 Rinocomp 3.9.1 21072011 memiliki fitur terbaru yaitu Wallhack + Chams + Crosshair + No Recoil. Cheat point blank ini sudah ditest di windows xp sp 2 work 100% no bt 2 jam.

Thanks To :
All member N3

Fitur :
1 hit sg gosong auto on
InvisibleKill,Norespawn,PasangBom dan Defuse 0 detik, tekan INSERT untuk mengaktifkannya sblm play/ready

Password : rinocomp2
Work on all windows

File name:
RINOCOMP3.9.1.rar
Submission date:
2011-07-17 00:00:00 (UTC)
Current status:
Finished
Result:
9/ 43 (20.9%)

Download Cheat
Read more »

Cheat Point Blank 21 Juli 2011 Update terbaru


Cheat Point Blank PB 21 Juli 2011 Rinocomp 3.9.1 21072011 memiliki fitur terbaru yaitu Wallhack + Chams + Crosshair + No Recoil. Cheat point blank ini sudah ditest di windows xp sp 2 work 100% no bt 2 jam.

Thanks To :
All member N3

Fitur :
1 hit sg gosong auto on
InvisibleKill,Norespawn,PasangBom dan Defuse 0 detik, tekan INSERT untuk mengaktifkannya sblm play/ready

Password : rinocomp2
Work on all windows

File name:
RINOCOMP3.9.1.rar
Submission date:
2011-07-17 00:00:00 (UTC)
Current status:
Finished
Result:
9/ 43 (20.9%)

Download Cheat
Read more »

Rabu, 20 Juli 2011

NET Framework 3.0 Service Pack 2 Update for Windows Server 2003 and Windows XP

nih gan netframework/frame network...

gak pake basa basi nih link dlnya...

donwload:http://www.microsoft.com/download/en/details.aspx?displaylang=en&id=6962
Read more »

Selasa, 19 Juli 2011

RF Night Mystery 2.2.3.2 [New Lokal Server]


»Welcome To RF Night Mystery«


saya disini mw share doang.. ada RF Baru nih.. Lokal yang seru.. mayan buat seru-seruan ajah.. wkwkwk .. Jangan lupa gan.. ini RF Versi "Golden Age" 2.2.3.2

Quote:
Originally Posted by Spesifikasi Server
Exp x1500
Animus x7500
Sell x300
Drop x60
Pokoknye Maknyus gan.. wkwkw -.- ini masih tahap "Close Beta" a.k.a test, tapi 50:50 gan antara WIPE dan NGGAK

Quote:
Game CP : Kursor Ente di sne gan
Register : Klik Aje gan
Full Patch : Klik Gan
Inget gan.. ini RF Golden Mystery 2.2.3.2
Read more »

Cara Pasang Gambar Favicon Di Blogger

Favicon adalah singkatan dari favorite icon. Sebuah gambar kecil yang terlihat pada address bar sebelah kiri URL/alamat blog. Bagi pengguna blogger, biasanya favicon yang terpajang berupa Logo B ciri khas dari blogspot. Tapi jika tidak suka, sobat bisa mengganti favicon bawaan blogger alias pasang gambar favicon kreasi sendiri.

favicon+blogger+1


Seperti pada blogerdin. Coba perhatikan, dulu gambar favicon tersebut hanya berupa logo dari blogger. tapi sekarang saya ganti menjadi gambar smilley. Sangat menarik bukan? Bagi sobat pengguna blogger, kalau mau, bisa juga menggantinya.

Jika sobat memang tertarik untuk mengganti favicon pada blogger. Berikut adalah langkahnya.

1. siapkan sebuah gambar apa saja yang nanti akan dijadikan gambar favicon. Lebih bagus calon gambar faviconnya berukuran kotak persegi.

2. Kunjungi alamat http://www.htmlkit.com/favicon

3. setelah masuk. Pada Image to use pilih file gambar yang sudah disiapkan tadi. Lalu klik tombol Generate favicon.ico.

4. Tunggu beberapa saat sampai gambar yang dipilih terlihat.

5.Setelah terlihat, langkah selanjutnya adalah klik link Download favicon package. Dan tunggu sampai proses download selesai.

6. setelah berhasil terdownload. File tersebut masih berformat Zip. Contoh Favicon_182708.zip dan ekstraklah dulu filenya ke .gif

7. selanjutnya simpan gambar tersebut ke hosting gambar seperti ke photobucket atau picasa. Kalau saya menyimpannya di album flickr.com dan mengganti ukurannya ke thumbnail 16x16 px.

8. Setelah tersimpan pada hosting. Catat URL gambar tersebut. Contoh alamat favicon blogerdin adalah http://farm6.static.flickr.com/5093/5539626043_ac7ceae5f6_t.jpg

Langkah selanjutnya adalah memasang gambar favicon tersebut ke dalam template blog milik sobat. Dan Langkahnya adalah sebagai berikut:

9. Login ke blogger. Klik rancangan. Lalu klik EDIT HTML.

10. Selanjutnya klik link bertuliskan Download template lengkap. Ini untuk mengantisipasi jika nanti terjadi kesalahan dalam pengeditan template.

11. selesai mendownload. Selanjutnya beri centang pada kombo disamping Expand template widget.

12. sekarang cari kode seperti dibawah ini. Supaya mudah dalam mencarinya gunakan saja fungsi Ctrl+F.

<b:skin><![CDATA[/*

13. setelah ketemu. Tepat diatas kode tersebut (no.12) masukan kode dibawah ini.

<link href='http://farm6.static.flickr.com/5093/5539626043_ac7ceae5f6_t.jpg' rel='shortcut icon'/>

Perhatikan pada tulisan berwarna merah. Ganti kode tersebut dengan URL gambar favicon milik sobat.

14. sehingga setelah digabung. tampilan kodenya akan seperti ini:

<link href='http://farm6.static.flickr.com/5093/5539626043_ac7ceae5f6_t.jpg' rel='shortcut icon'/>
<b:skin><![CDATA[/*

15. Setelah selesai menyisipkan kodenya. Jangan lupa klik tombol Simpan template sampai ada keterangan perubahan anda telah disimpan 'lihat blog'

16. klik lihat blog guna melihat hasilnya. Dan jika berhasil, pada address bar atau disamping kiri URL blog, akan terpajang gambar favicon baru milik sobat.

17. terakhir, ya selesai. selamat mencoba dan semoga berhasil!

Itulah cara yang saya gunakan pada blogerdin untuk mengganti gambar favicon milik blogger alias pasang gambar favicon pilihan saya.

Read more »

Cara Membuat Salju Turun dari Kursor

Anda Pasti pernah melihat blog milik orang-orang bila anda masuk pasti sudah diedite dengan begitu bagu. Saya akan memberitahu sedikit bagaimana cara agar membuat salju turun dari Mouse/Kursor .

Caranya cukup mudah
1. Masuk ke Blog Anda
2. Pilih Rancangan
3. Tambah Gedget HTML
4. Copy Paste ini

<script type='text/javascript'>
// <![CDATA[
var colour="blue";
var sparkles=100;

var x=ox=400;
var y=oy=300;
var swide=800;
var shigh=600;
var sleft=sdown=0;
var tiny=new Array();
var star=new Array();
var starv=new Array();
var starx=new Array();
var stary=new Array();
var tinyx=new Array();
var tinyy=new Array();
var tinyv=new Array();
window.onload=function() { if (document.getElementById) {
var i, rats, rlef, rdow;
for (var i=0; i<sparkles; i++) {
var rats=createDiv(3, 3);
rats.style.visibility="hidden";
document.body.appendChild(tiny[i]=rats);
starv[i]=0;
tinyv[i]=0;
var rats=createDiv(5, 5);
rats.style.backgroundColor="transparent";
rats.style.visibility="hidden";
var rlef=createDiv(1, 5);
var rdow=createDiv(5, 1);
rats.appendChild(rlef);
rats.appendChild(rdow);
rlef.style.top="3px";
rlef.style.left="0px";
rdow.style.top="0px";
rdow.style.left="3px";
document.body.appendChild(star[i]=rats);
}
set_width();
sparkle();
}}
function sparkle() {
var c;
if (x!=ox || y!=oy) {
ox=x;
oy=y;
for (c=0; c<sparkles; c++) if (!starv[c]) {
star[c].style.left=(starx[c]=x)+"px";

star[c].style.top=(stary[c]=y)+"px";
star[c].style.clip="rect(0px, 5px, 5px, 0px)";
star[c].style.visibility="visible";
starv[c]=50;
break;
}
}
for (c=0; c<sparkles; c++) {
if (starv[c]) update_star(c);
if (tinyv[c]) update_tiny(c);
}
setTimeout("sparkle()", 40);
}
function update_star(i) {
if (--starv[i]==25) star[i].style.clip="rect(1px, 4px, 4px, 1px)";
if (starv[i]) {
stary[i]+=1+Math.random()*3;
if (stary[i]<shigh+sdown) {
star[i].style.top=stary[i]+"px";
starx[i]+=(i%5-2)/5;
star[i].style.left=starx[i]+"px";
}
else {
star[i].style.visibility="hidden";
starv[i]=0;
return;
}

}
else {
tinyv[i]=50;
tiny[i].style.top=(tinyy[i]=stary[i])+"px";
tiny[i].style.left=(tinyx[i]=starx[i])+"px";
tiny[i].style.width="2px";
tiny[i].style.height="2px";
star[i].style.visibility="hidden";
tiny[i].style.visibility="visible"
}
}
function update_tiny(i) {
if (--tinyv[i]==25) {
tiny[i].style.width="1px";
tiny[i].style.height="1px";
}
if (tinyv[i]) {
tinyy[i]+=1+Math.random()*3;
if (tinyy[i]<shigh+sdown) {
tiny[i].style.top=tinyy[i]+"px";
tinyx[i]+=(i%5-2)/5;
tiny[i].style.left=tinyx[i]+"px";
}
else {


tiny[i].style.visibility="hidden";
tinyv[i]=0;
return;
}
}
else tiny[i].style.visibility="hidden";
}
document.onmousemove=mouse;
function mouse(e) {
set_scroll();
y=(e)?e.pageY:event.y+sdown;
x=(e)?e.pageX:event.x+sleft;
}
function set_scroll() {
if (typeof(self.pageYOffset)=="number") {
sdown=self.pageYOffset;
sleft=self.pageXOffset;
}
else if (document.body.scrollTop || document.body.scrollLeft) {
sdown=document.body.scrollTop;
sleft=document.body.scrollLeft;
}
else if (document.documentElement && (document.documentElement.scrollTop || document.documentElement.scrollLeft)) {
sleft=document.documentElement.scrollLeft;
sdown=document.documentElement.scrollTop;
}
else {
sdown=0;
sleft=0;
}
}
window.onresize=set_width;
function set_width() {
if (typeof(self.innerWidth)=="number") {
swide=self.innerWidth;
shigh=self.innerHeight;
}
else if (document.documentElement && document.documentElement.clientWidth) {
swide=document.documentElement.clientWidth;
shigh=document.documentElement.clientHeight;
}
else if (document.body.clientWidth) {
swide=document.body.clientWidth;
shigh=document.body.clientHeight;
}
}
function createDiv(height, width) {
var div=document.createElement("div");
div.style.position="absolute";
div.style.height=height+"px";
div.style.width=width+"px";
div.style.overflow="hidden";
div.style.backgroundColor=colour;
return (div);
}
// ]]>
</script>

<a href="http://www.infosantai.co.cc">infosantai.co.cc</a>


5. Simpan dan lihat blog anda ..

untuk warna anda bisa ganti dengan keinginan anda sendiri  (  var colour="blue";   )
red
blue
white
green
DLL....
Read more »

Map dota 6.72e

ini gan map dota 67.2e...
gak pake basa basi..
langsung ajj nih linknya...

http://www.epicwar.com/maps/178693/
Read more »

Minggu, 17 Juli 2011

cara Membuat Judul Posting Berjalan [Bounce]

Tutorial BloGGeR tentang Read More Berjalan, dapat juga diterapkan di judul Posting, sehingga judul poostingpun bisa menari. Fungsi ini tercipta berkat Efek bounce yang diciptakan melalui fungsi marquee effects. Penerapan efek ini pada judul posting akan membuat teks pada judul posting bergerak ke arah kanan dan ke arah kiri secara terus menerus. Tek akan berbalik arah ketika sudah mentok di ujung kanan atau kiri. Contoh efek bounce bisa kamu lihat di sini !

Tentu saja judul posting ini tidak boleh secara terus menerus bergerak karena ketika pembaca blog akan meng"KLIK" pada judul menjadi kesulitan. Dengan menambah sedikit script maka ketika mouse berada di atas judul posting maka teks akan berhenti bergerak dan akan kembali ber"bounceria" ketika mouse dilepaskan.

Langkah membuat Efek Bounce pada Judul Posting :
1. Login ke Blogger.
2. Lakukan pengamanan template.
3. Tetap di Edit HTML.
4. KLIK Expand Template Widget.
5. Cari KODE :


<b:if cond='data:post.title'>
<h3 class='post-title entry-title'>
<b:if cond='data:post.link'>
<a expr:href='data:post.link'><data:post.title/></a>
<b:else/>
<b:if cond='data:post.url'><a expr:href='data:post.url'><data:post.title/></a>
<b:else/>
<data:post.title/>
</b:if>
</b:if>
</h3>
</b:if>


Ganti KODE di atas dengan KODE di bawah :

<b:if cond='data:post.title'>
<h3 class='post-title entry-title'>
<marquee behavior='alternate' onmouseout='this.start()' onmouseover='this.stop()'>
<b:if cond='data:post.link'>
<a expr:href='data:post.link'><data:post.title/></a>
<b:else/>
<b:if cond='data:post.url'><a expr:href='data:post.url'><data:post.title/></a><b:else/>
<data:post.title/>
</b:if>
</b:if>
</marquee>
</h3>
</b:if>


Atau kamu juga bisa lakukan dengan cara :

Ganti KODE berikut :

<a expr:href='data:post.url'><data:post.title/></a>

Dengan :

<a expr:href='data:post.url'>
<marquee behavior='alternate' onmouseout='this.start()' onmouseover='this.stop()'>
<data:post.title/>
</marquee>
</a>

Catatan :
  1. Jangan lupa KLIK Simpan Template
  2. Efek bounce ini berfungsi dengan sempurna di Opera dan Internet Explorer (IE) dan Mozilla.
Read more »

Template by:

Free Blog Templates

Silahkan lihat lihat my blog :D